
Skip to content Download R1 Ready First Now →
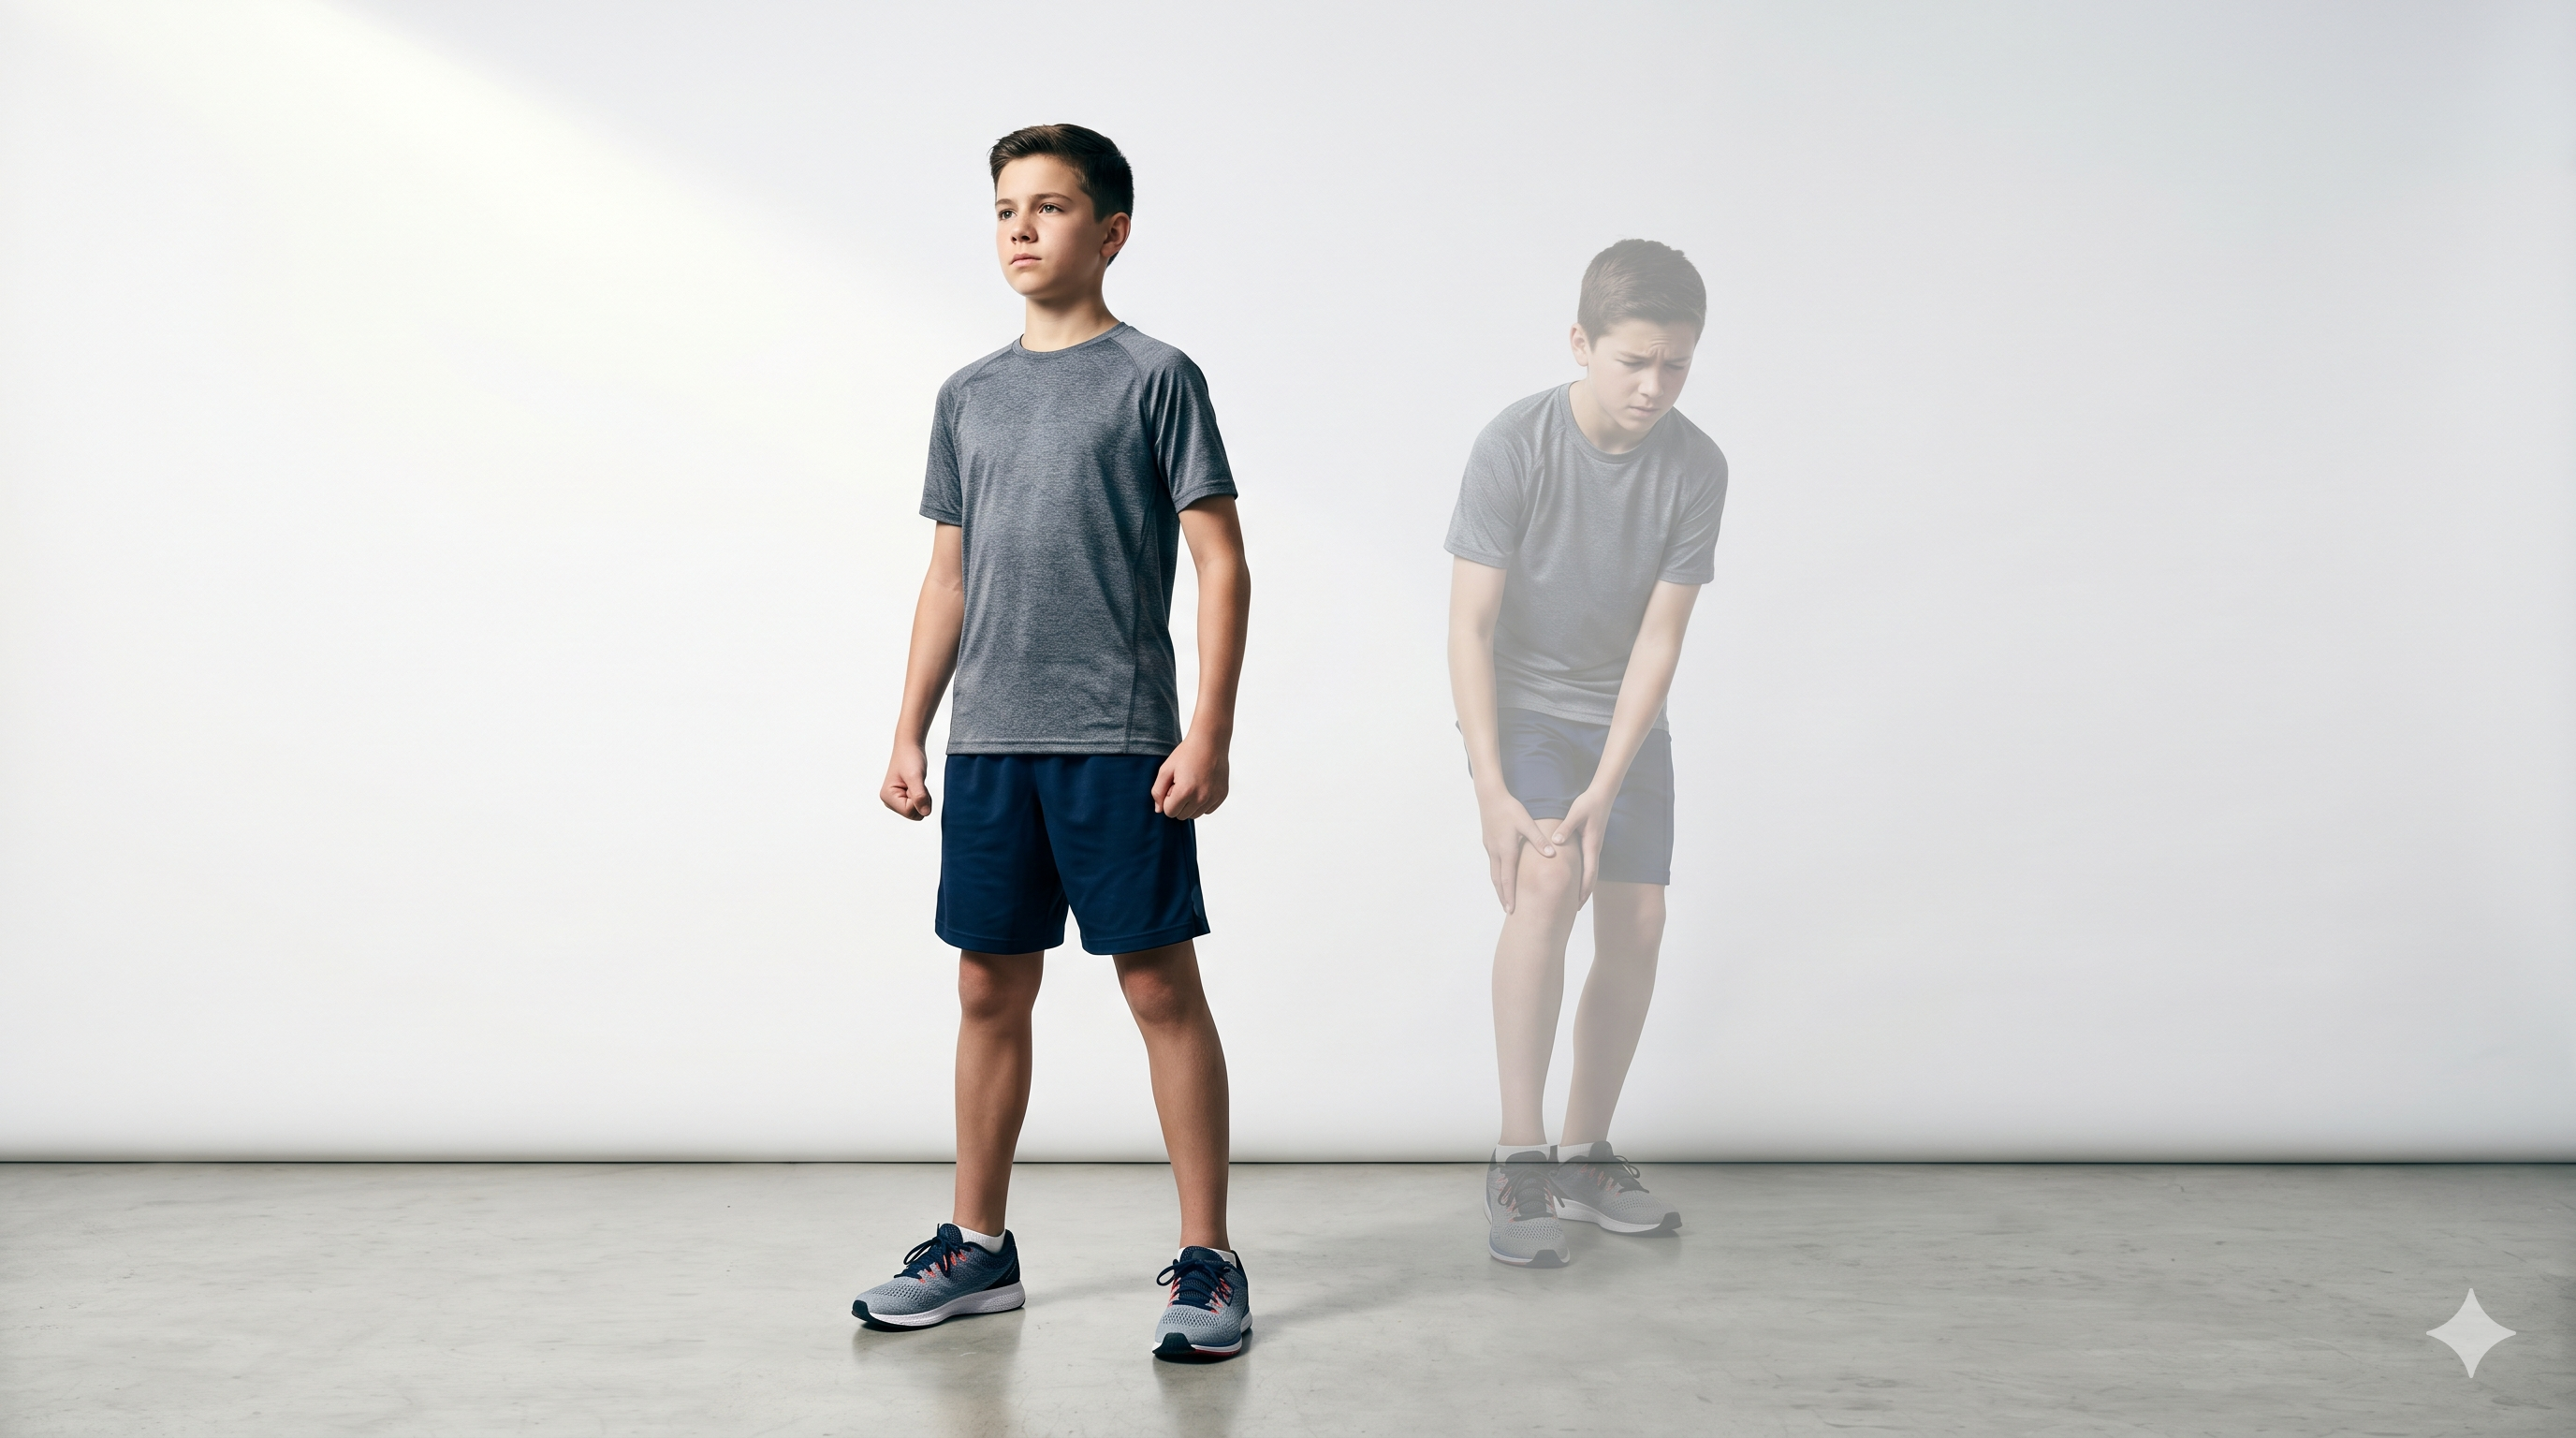
Confident youth athlete standing strong with a faded hesitant version beside him
Athlete Welfare · Injury & Recovery

The Ghost Injury

Your kid is cleared to play. That’s not the same as being ready.

Dr. Matt Kritz

More than 3.5 million children under 14 are injured playing sport or recreational activities every year in the United States. Lower limb injuries, ankle sprains, knee ligament damage, overuse injuries to the hip and thigh, account for the largest share. In high school athletics, the ankle and knee alone represent the two most frequently injured body sites. These numbers are why we’re starting here, with the lower limb, as the most practical example of a problem that runs deeper than the injury itself.

A study published in January 2025 in Frontiers in Physiology followed 18 youth female basketball players over 20 weeks. Athletes who came in with the heaviest injury history trained less, got hurt more, and missed more time than their teammates. Their fitness test scores, strength, agility, jumping, were nearly identical across both groups.

That finding gets cited as reassuring. It shouldn’t be. The fitness tests measured output. They didn’t measure how those outputs were produced. No electromyography during strength testing. No analysis of movement quality, compensation patterns, or neuromuscular control under load. Two athletes can score the same on a hop test while one is absorbing force cleanly and the other is dumping it through a malaligned knee on every rep. The score looks the same. The injury risk is not.

The study’s own authors acknowledged this gap. What they identified, and what the fitness scores couldn’t capture, is what I call a ghost injury.

3.5M
Children under 14 injured in sport annually in the US
63%
Of youth sport injuries involve the lower extremities
2x+
Higher re-injury rate in athletes with prior injury history

What I mean by ghost injury

Ghost injury isn’t a clinical term. It’s a term I use because it describes something I’ve observed consistently across 25 years working with athletes from youth sport to the Olympic podium. The injury heals. The tissue repairs. The pain goes away. But the athlete is still haunted by the experience of it.

They felt the limb fail them. They spent weeks navigating rehab, moving with hesitation and compensation. The nervous system filed all of that away. And when they return to sport, even if they say the leg feels fine, there’s a reflection of what once was. A residue of doubt about whether that limb can be trusted to do what it used to do. They don’t say anything about it, because everyone around them, the coach, the parent, the doctor, is telling them they should be good to go. So they play. And they compensate. And nobody sees it until the next injury happens.

That doubt doesn’t show up on a fitness test. It shows up in how hard they cut, how fully they commit their weight, how confidently they push off. The injured side gets protected. The load shifts to the other side. And the faulty mechanics that put the original limb at risk are almost certainly still present on the side that was never injured. Now that side is absorbing more of everything.

Confidence built through pep talks evaporates under pressure. Confidence built through evidence, by demonstrating the limb can do more than it could before the injury, that’s durable.

In elite environments we have baseline data on every athlete. When a doctor clears them to return, we can sit at that table and say: we appreciate the tissue has healed, but right now this athlete is at 40 percent of where they were before the injury. The pain is gone, the swelling is gone, but the motor control, the coordination, the strength, the capacity to maintain good mechanics under fatigue, those aren’t back yet. The round table exists for a reason. The doctor’s clearance starts the conversation. It doesn’t end it.

Most youth athletes don’t have a round table. What they need is a simple framework they can use at home.

Why injuries happen in the first place

Injuries occur when demand exceeds capacity. That’s the simple version and it holds across every injury type.

The forces and repetitive impacts of sport exceed the capacity of the soft tissue to absorb them. Poor movement mechanics mean force travels through malaligned joints. That generates micro-tears and cumulative trauma over time. Movements that should be routine become painful. Relatively innocuous actions become the moment the tissue finally gives way.

Acute injuries look different on the surface but the same principle applies. A hard cut, a contested landing, a foot placed somewhere unexpected. The athlete tries to adjust in a split second but the proprioceptive system, the body’s real-time sensing and control network, doesn’t have the capacity to make that adjustment fast enough. The joint loads in a position it can’t handle. The ligament sprains or ruptures.

What drives both scenarios is a gap between what the body is being asked to do and what it has been prepared to do. Most youth athletes are performing at volumes and intensities their bodies were never systematically prepared for. Practices exist to develop skills and prepare for the game on Friday. The foundational physical preparation that would reduce injury risk isn’t happening in practice, and it’s not being made accessible at home. Until now.

How kids get cleared and why it falls short

The standard return-to-sport process in the United States moves quickly. Injury at practice or a game. Urgent care or ER rules out a fracture. Referral to a sports medicine physician or orthopedic surgeon. A course of physical therapy, typically eight to twelve sessions depending on what insurance covers. Pain reduces. Range of motion returns. The PT clears them. The doctor signs off.

The athlete is told to ease back in. Start jogging. Progress to running. Work back into sport-specific drills. A few weeks later they’re back in the lineup.

What nobody asked: what was this athlete’s baseline before the injury? How much single-leg control did they have? What did their landing mechanics look like? Without those reference points, cleared to play and ready to play become the same thing by default. They aren’t.

The progression: what it is and why it’s built this way

The five movements below follow a simple logic: start from stable, elevate the load, integrate the limb in movement, build reactive capacity, then test under explosive demand. Each step is a proof of readiness for the one that follows. Together they trace the arc from basic tissue tolerance through to the kind of dynamic, reactive performance that sport actually requires.

How the progression works

1
Hold Still
Can the system load the joint without failing?
2
Load Higher
Can it hold under increased ankle and calf demand?
3
Move Through Range
Can it produce and absorb force through a full pattern?
4
React and Repeat
Can it handle repeated loading at speed?
5
Explode and Control
Can it absorb maximal force and hold it?

These aren’t the only exercises that work. There are plenty of variations and you can find examples of most of them on YouTube by searching the movement name. What matters is the logic of the progression: stable before dynamic, controlled before reactive, general before sport-specific. If you have exercises you already use that follow this arc, use them. The framework is the point, not the specific movements.
Lower Limb · Readiness Progression

Five Proofs of Readiness

Work in order. Both legs must meet the standard before moving to the next movement. If a movement hurts, stay there, build capacity, then progress.

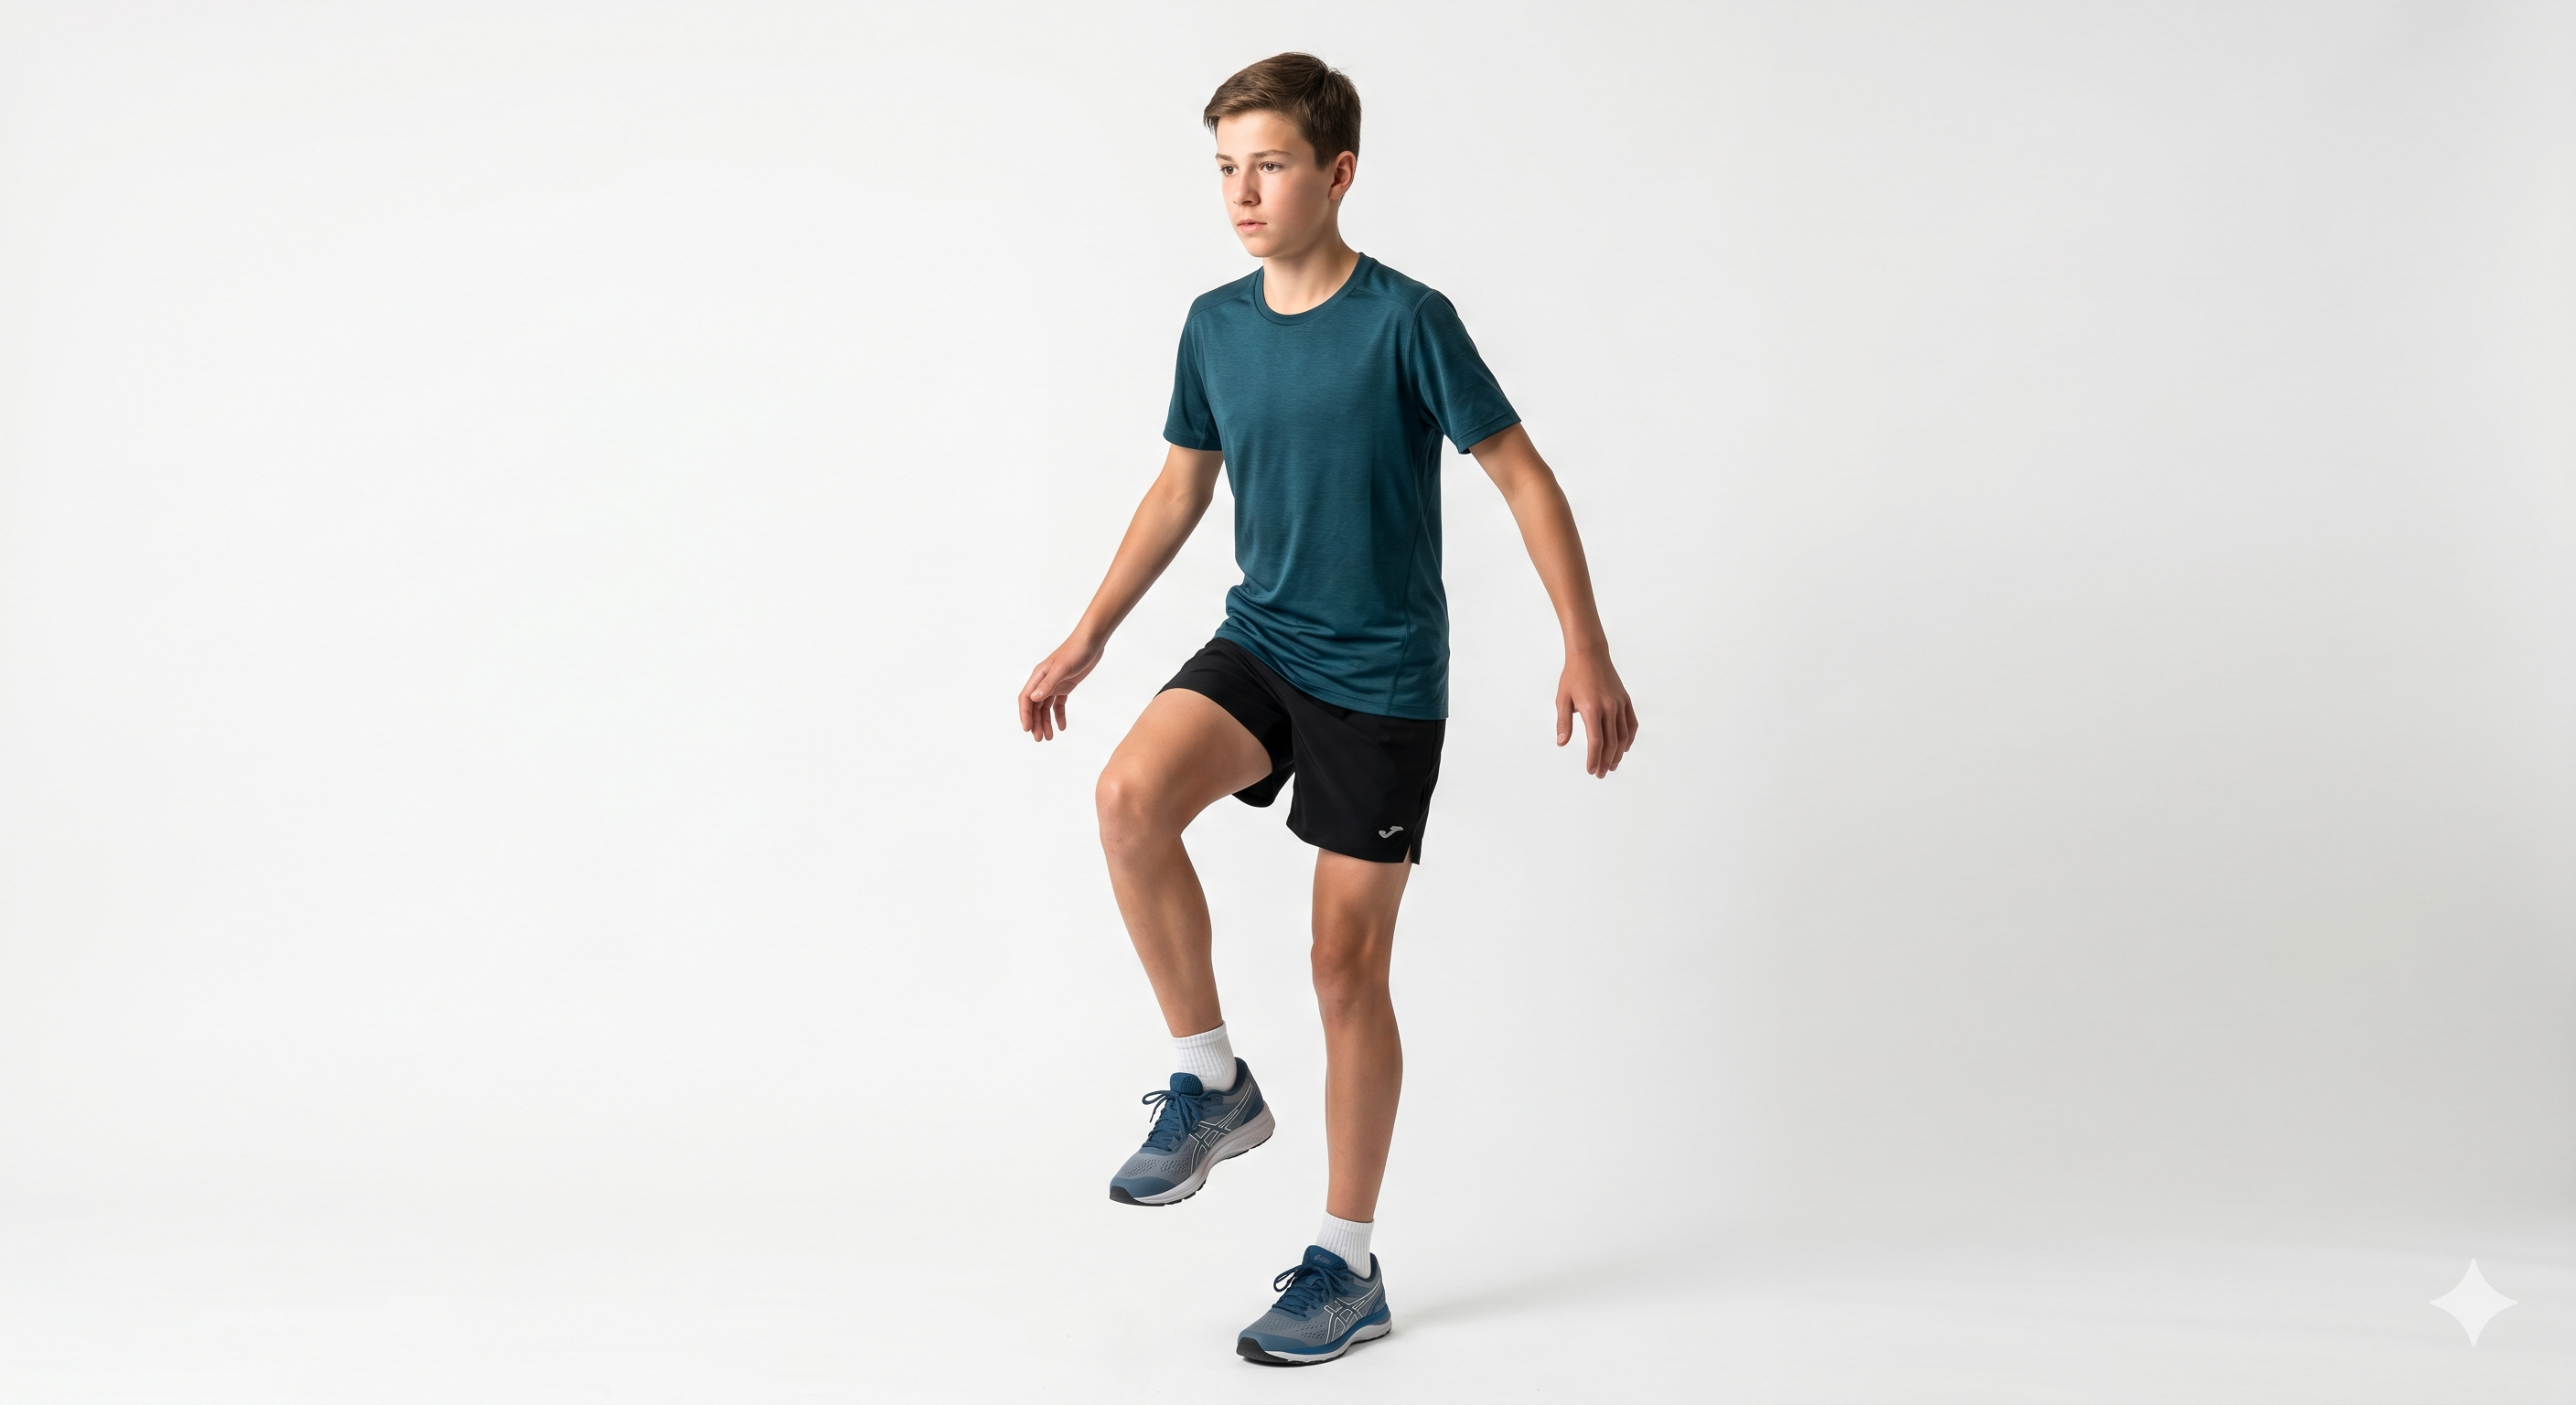
Single-leg stance
Step 01 · Stable
Single-Leg Stance
This isn’t a balance test. It’s a test of whether the hip, knee, and ankle can coordinate to hold a loaded position without the nervous system defaulting to the other side. Every sport movement starts from single-leg. An athlete who can’t hold this cleanly is already compensating before they’ve taken a step. Downstream, that compensation presents as chronic knee pain, recurring ankle sprains, and progressive hip overload on the side that was never injured.
Stand on one leg, slight bend at the hip and knee, trunk leaning gently forward. Arms relaxed. Hold without compensating or bailing.
Readiness Standard 30 seconds each leg. Two sets. Both sides should feel equally controlled.
If it hurts: Reduce the knee bend to a pain-free range and hold there. Build duration before increasing the load angle.
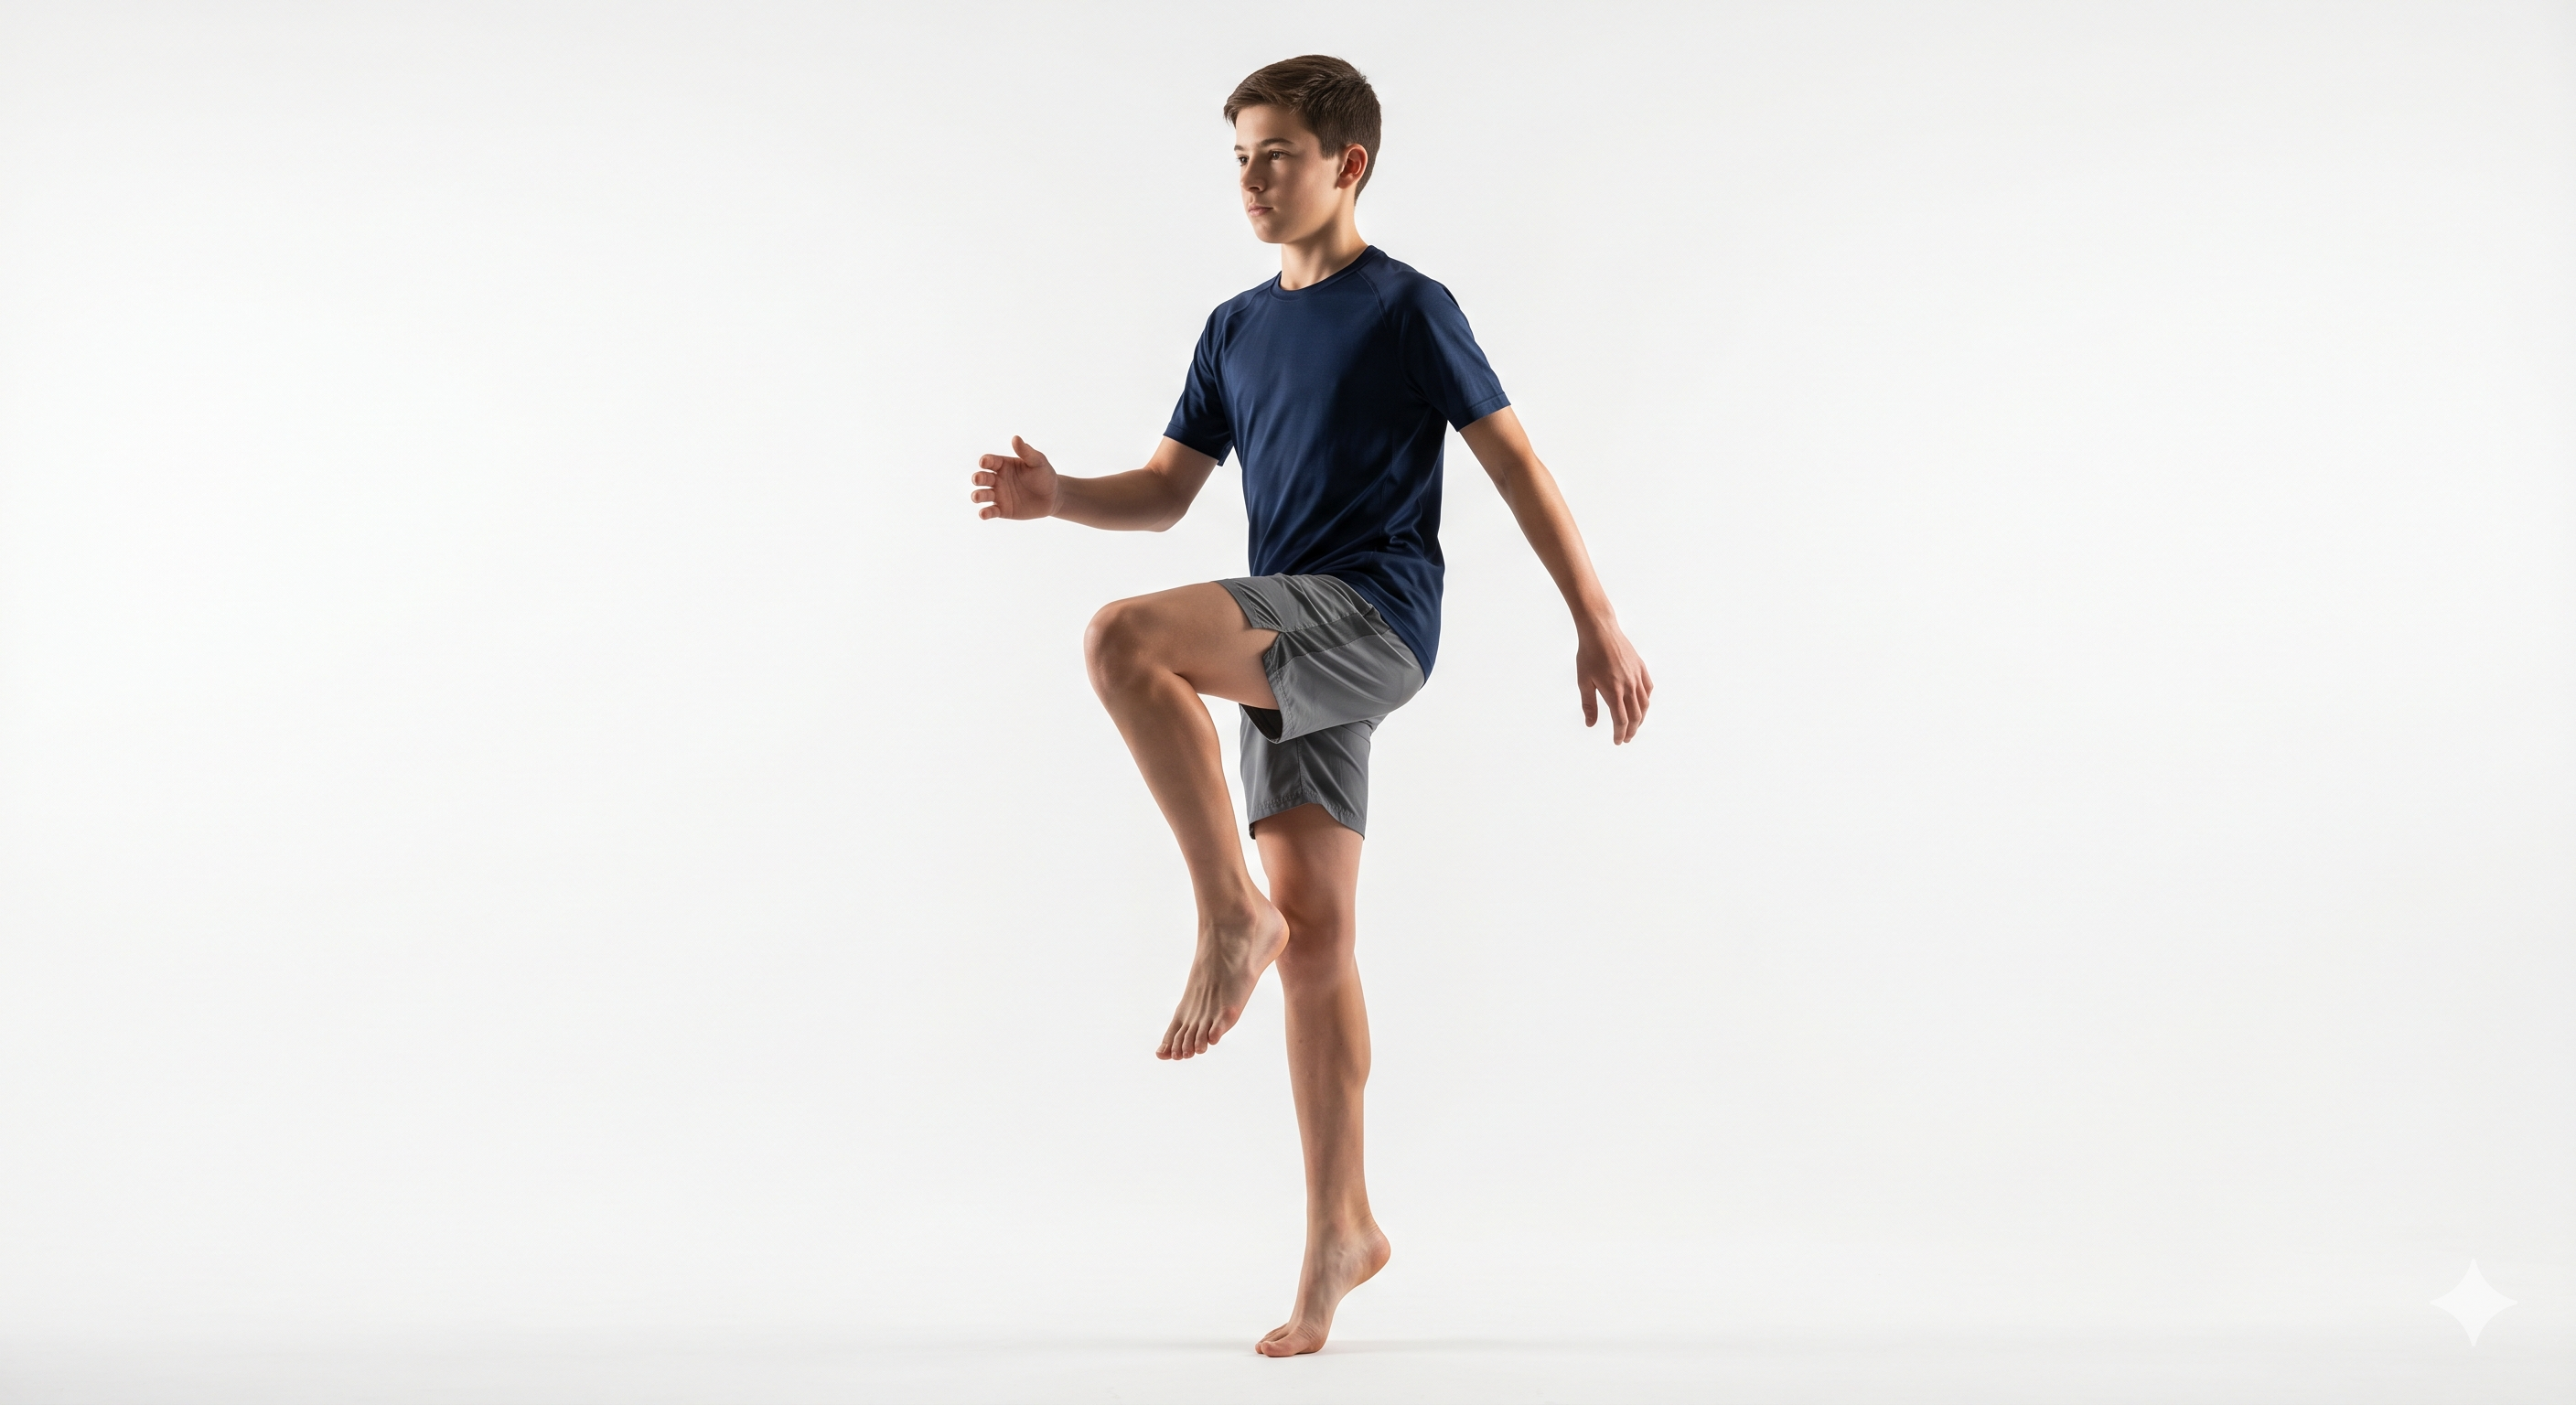
Single-leg stance on ball of foot
Step 02 · Stable Under Load
Single-Leg Stance on Ball of Foot
Rising onto the ball of the foot shifts load directly into the ankle complex and the calf system that stabilises it. After an ankle sprain or lower leg injury, this is where the gap between healed tissue and restored function shows up most clearly. An athlete who wobbles or collapses here hasn’t rebuilt the proprioceptive loop the ankle relies on to react in real time. That missing loop is what makes the re-sprain feel like bad luck. It isn’t. It’s predictable.
Same position as Step 1. Rise onto the ball of the foot. Maintain a bent knee and hip. Hold without the heel dropping.
Readiness Standard 30 seconds each leg. Two sets. Heel stays elevated throughout.
If it hurts: Return to Step 1 flat-footed until solid, then attempt a partial rise. Don’t force the full height.
Single-leg sit to stand from box
Step 03 · Strength Through Range
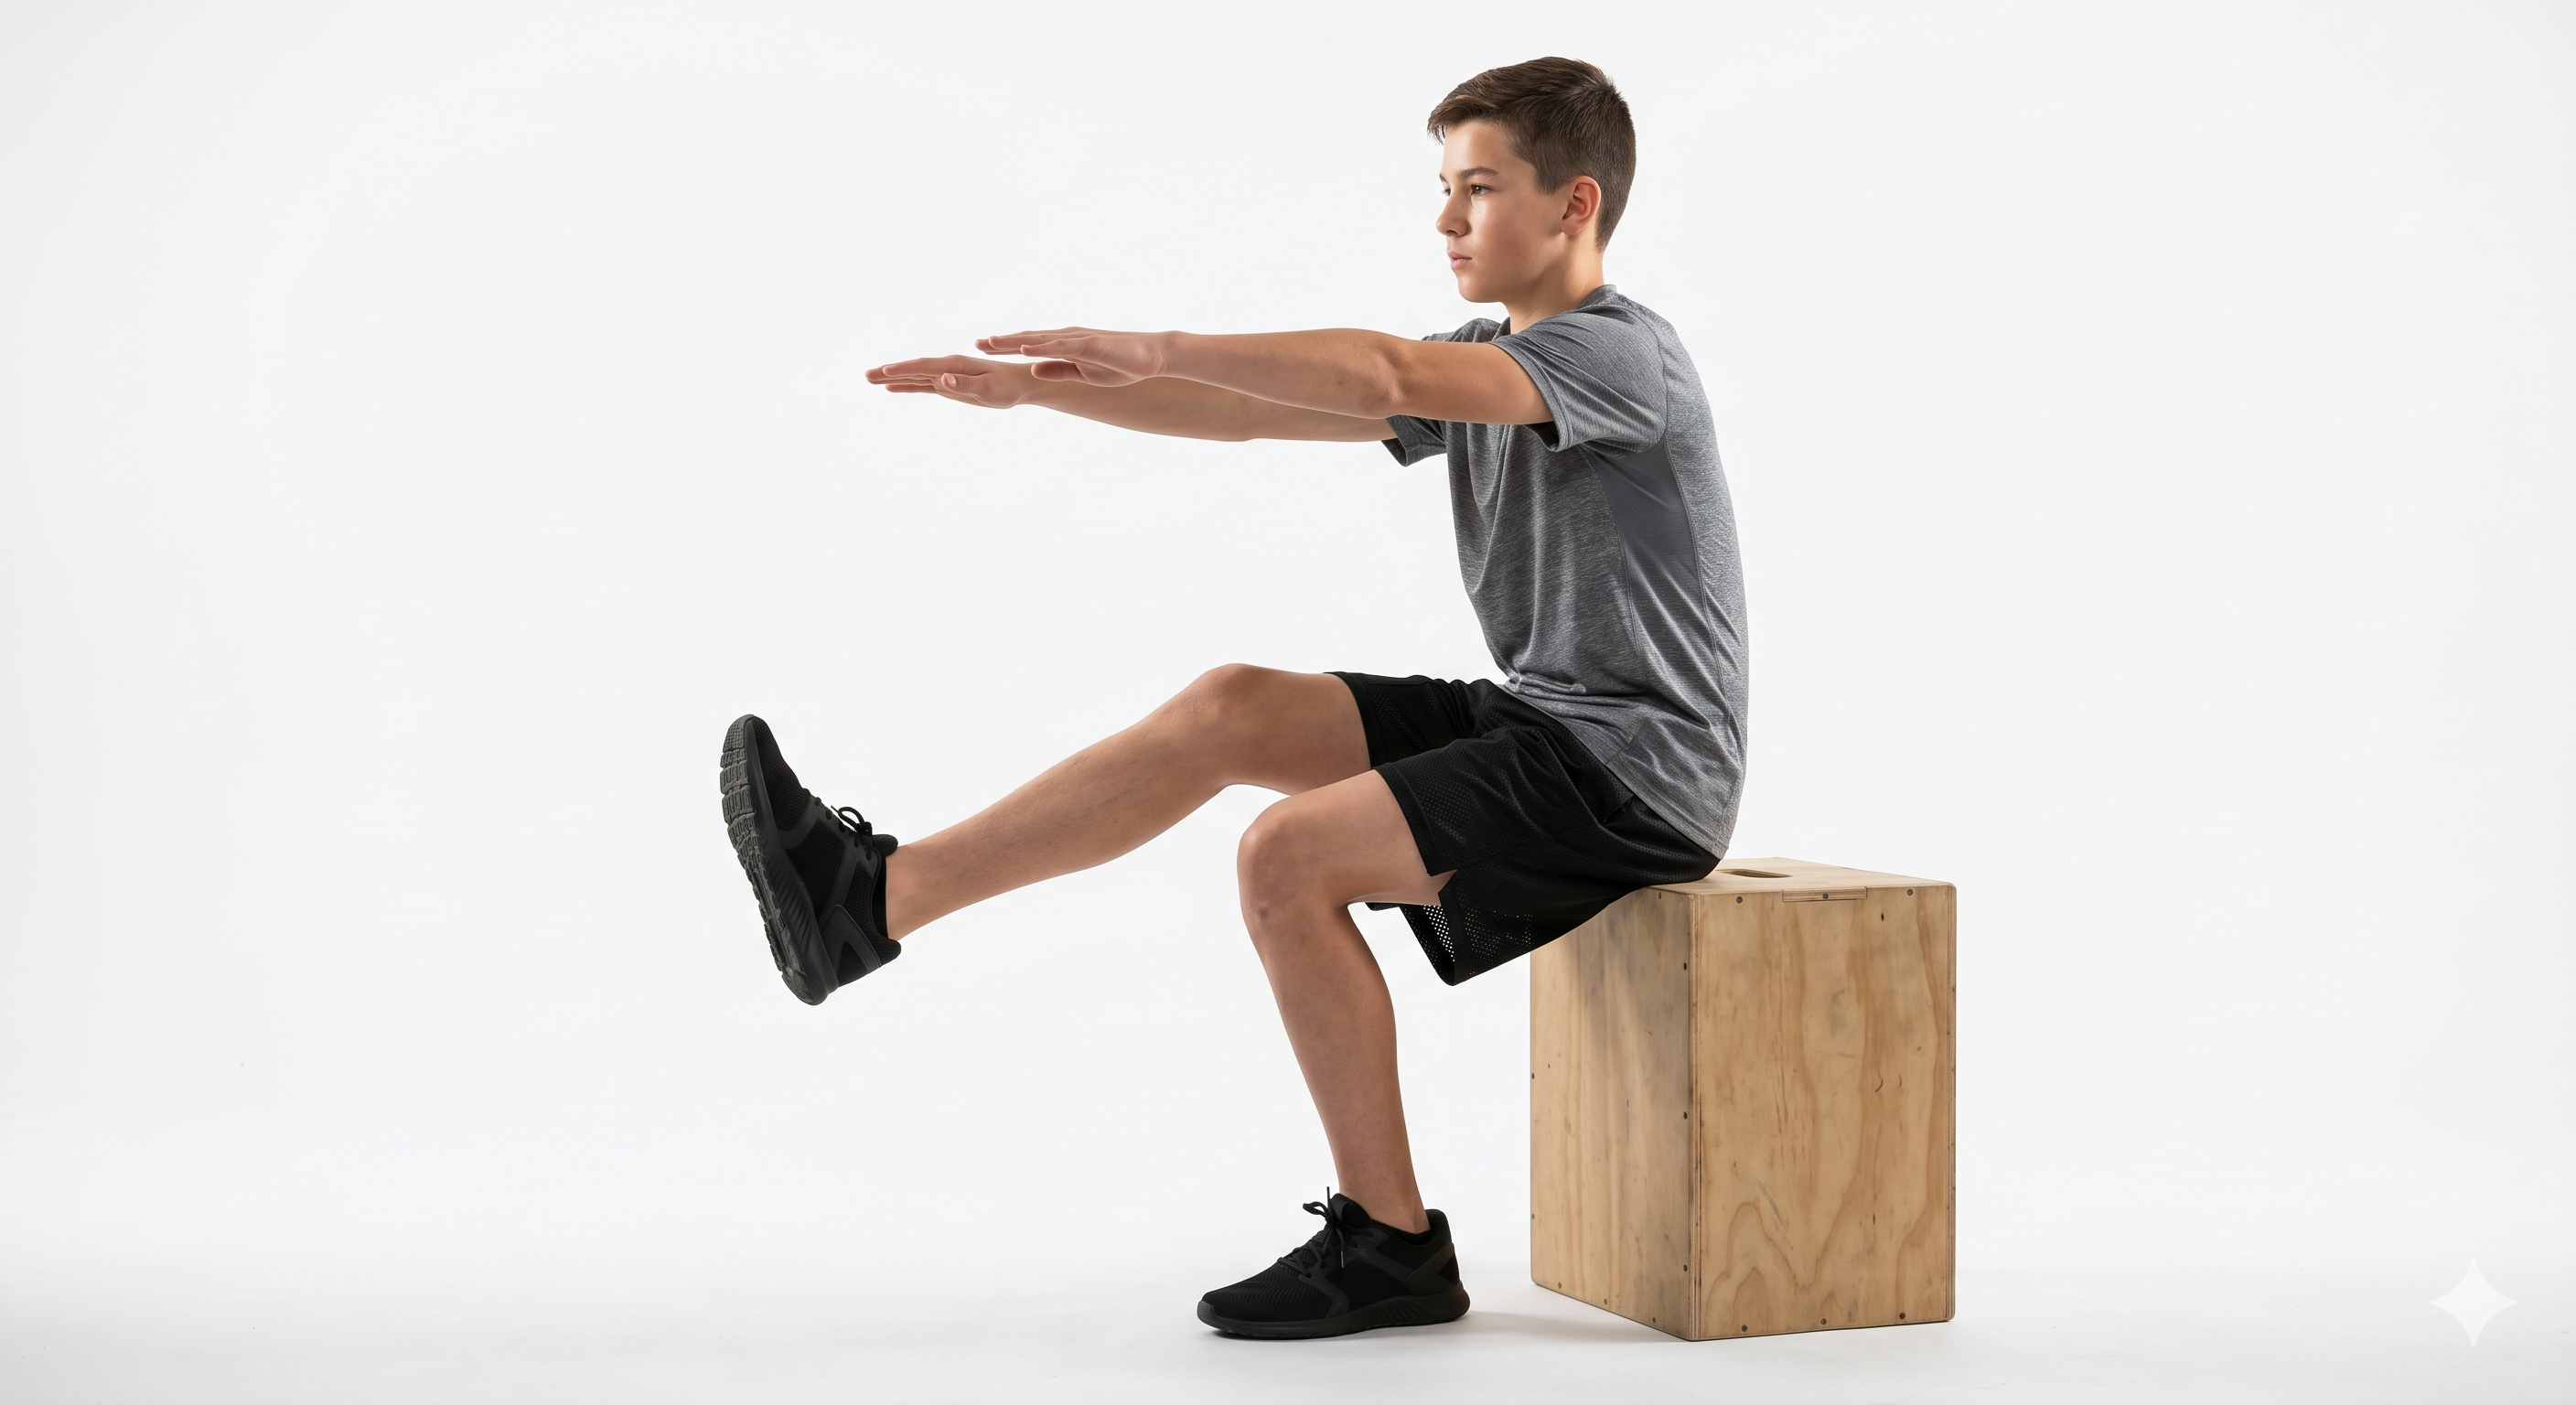
Single-Leg Sit to Stand
Static control is one thing. Moving through a full range of motion under single-leg load is another. This tests whether the quad, glute, and hip complex can produce and absorb force through an entire pattern on one leg. It also exposes knee tracking. If the knee collapses inward on the way up or down, the medial structures are under-supported and re-injury risk is elevated regardless of what the imaging showed. Athletes who struggle here almost always also struggle with deceleration, which is where most non-contact knee injuries happen.
Sitting on a box or bench, one foot on the floor, the other lifted and extended forward. Stand fully using only the grounded leg, then lower under control. Arms extend forward for counterbalance. Knee tracks over the foot throughout.
Readiness Standard 25 reps each leg. Two sets. Controlled on the way down counts as much as getting up.
If it hurts: Start with two-leg sit to stand. Build volume and confidence on two legs, then transition back to single-leg when pain-free.
Single-leg hop in place
Step 04 · Load and Rebound
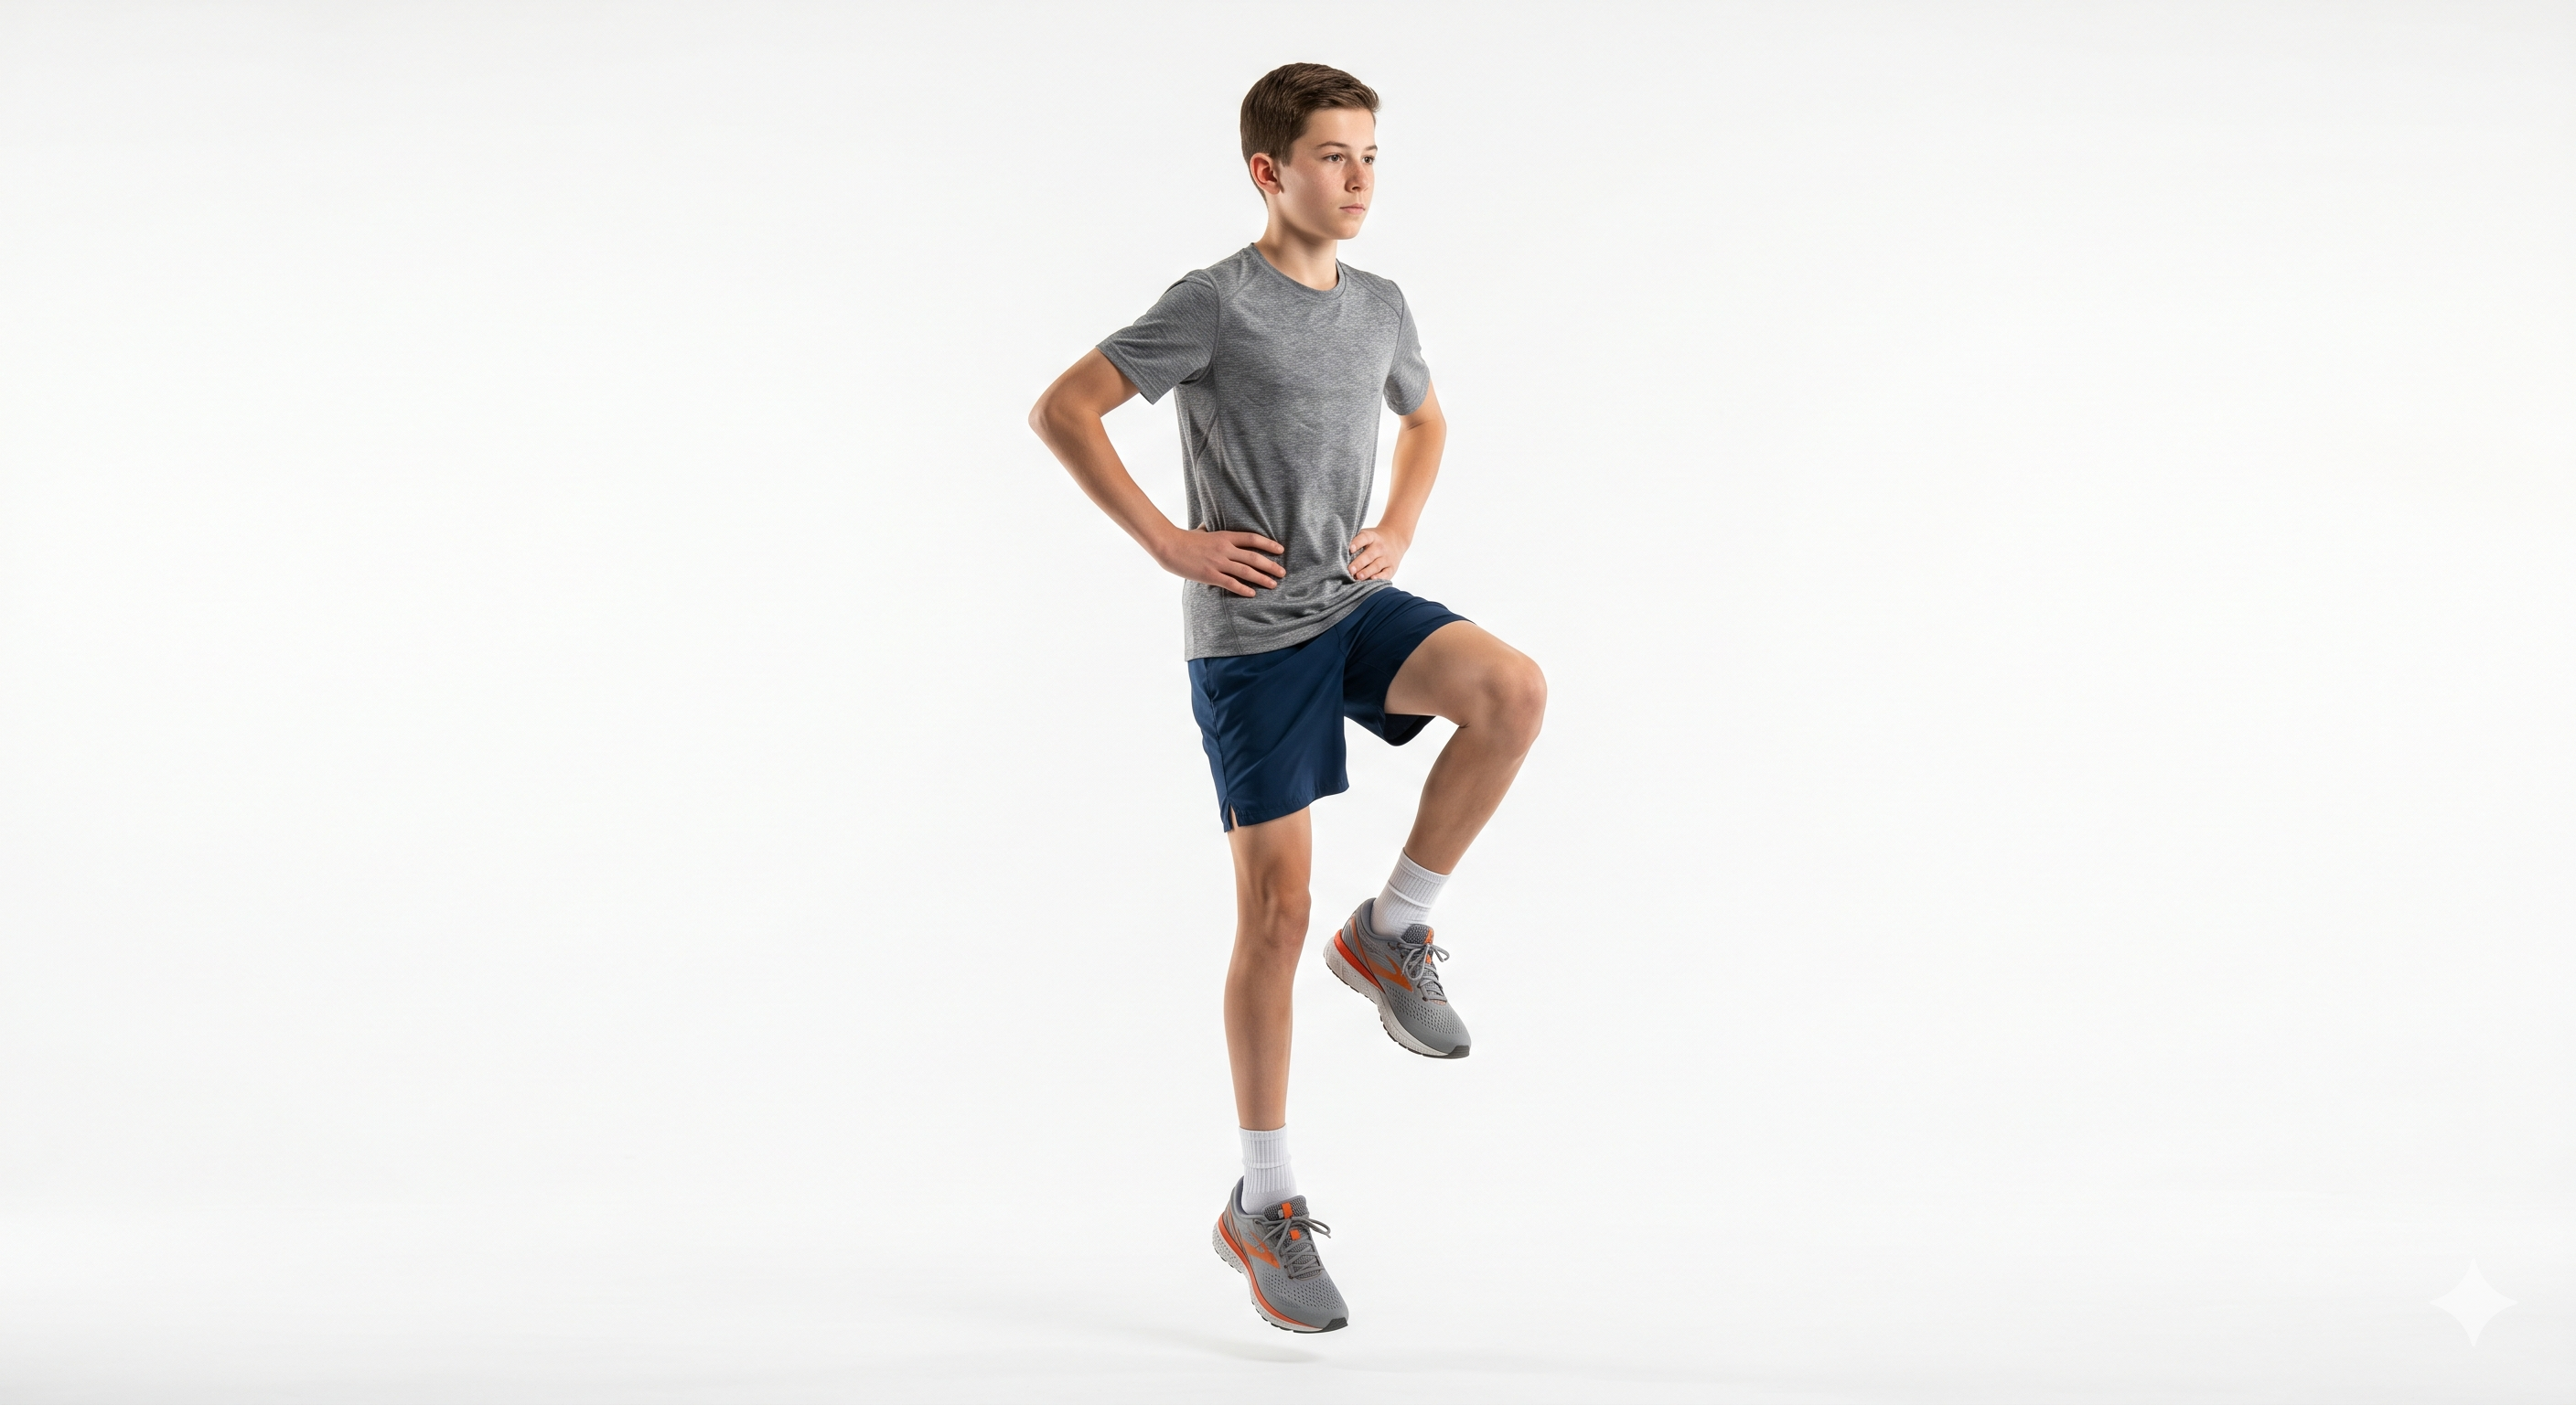
Single-Leg Hop
Static strength and dynamic reactivity are different systems. An athlete can pass Steps 1 through 3 and still stiffen, drift, or lose mechanics under repetitive loading because the stretch-shortening cycle in the tendon and muscle hasn’t been retrained. Stiffening through the ankle or knee on landing, or losing position after several hops, predicts tendon overload and stress injury risk downstream. Consistent, rhythmic, same-spot landing is the proof that the reactive system is back online.
In-place hopping on one leg. Soft landings, same spot each time, hip over knee over foot. Maintain rhythm throughout.
Readiness Standard 60 hops in 60 seconds each leg. Landing quality matters more than speed.
If it hurts: Reduce the hop height to minimize impact. Small controlled rebounds. Build volume before increasing intensity.
Jump off two legs, land on one and stick
Step 05 · Dynamic Proof
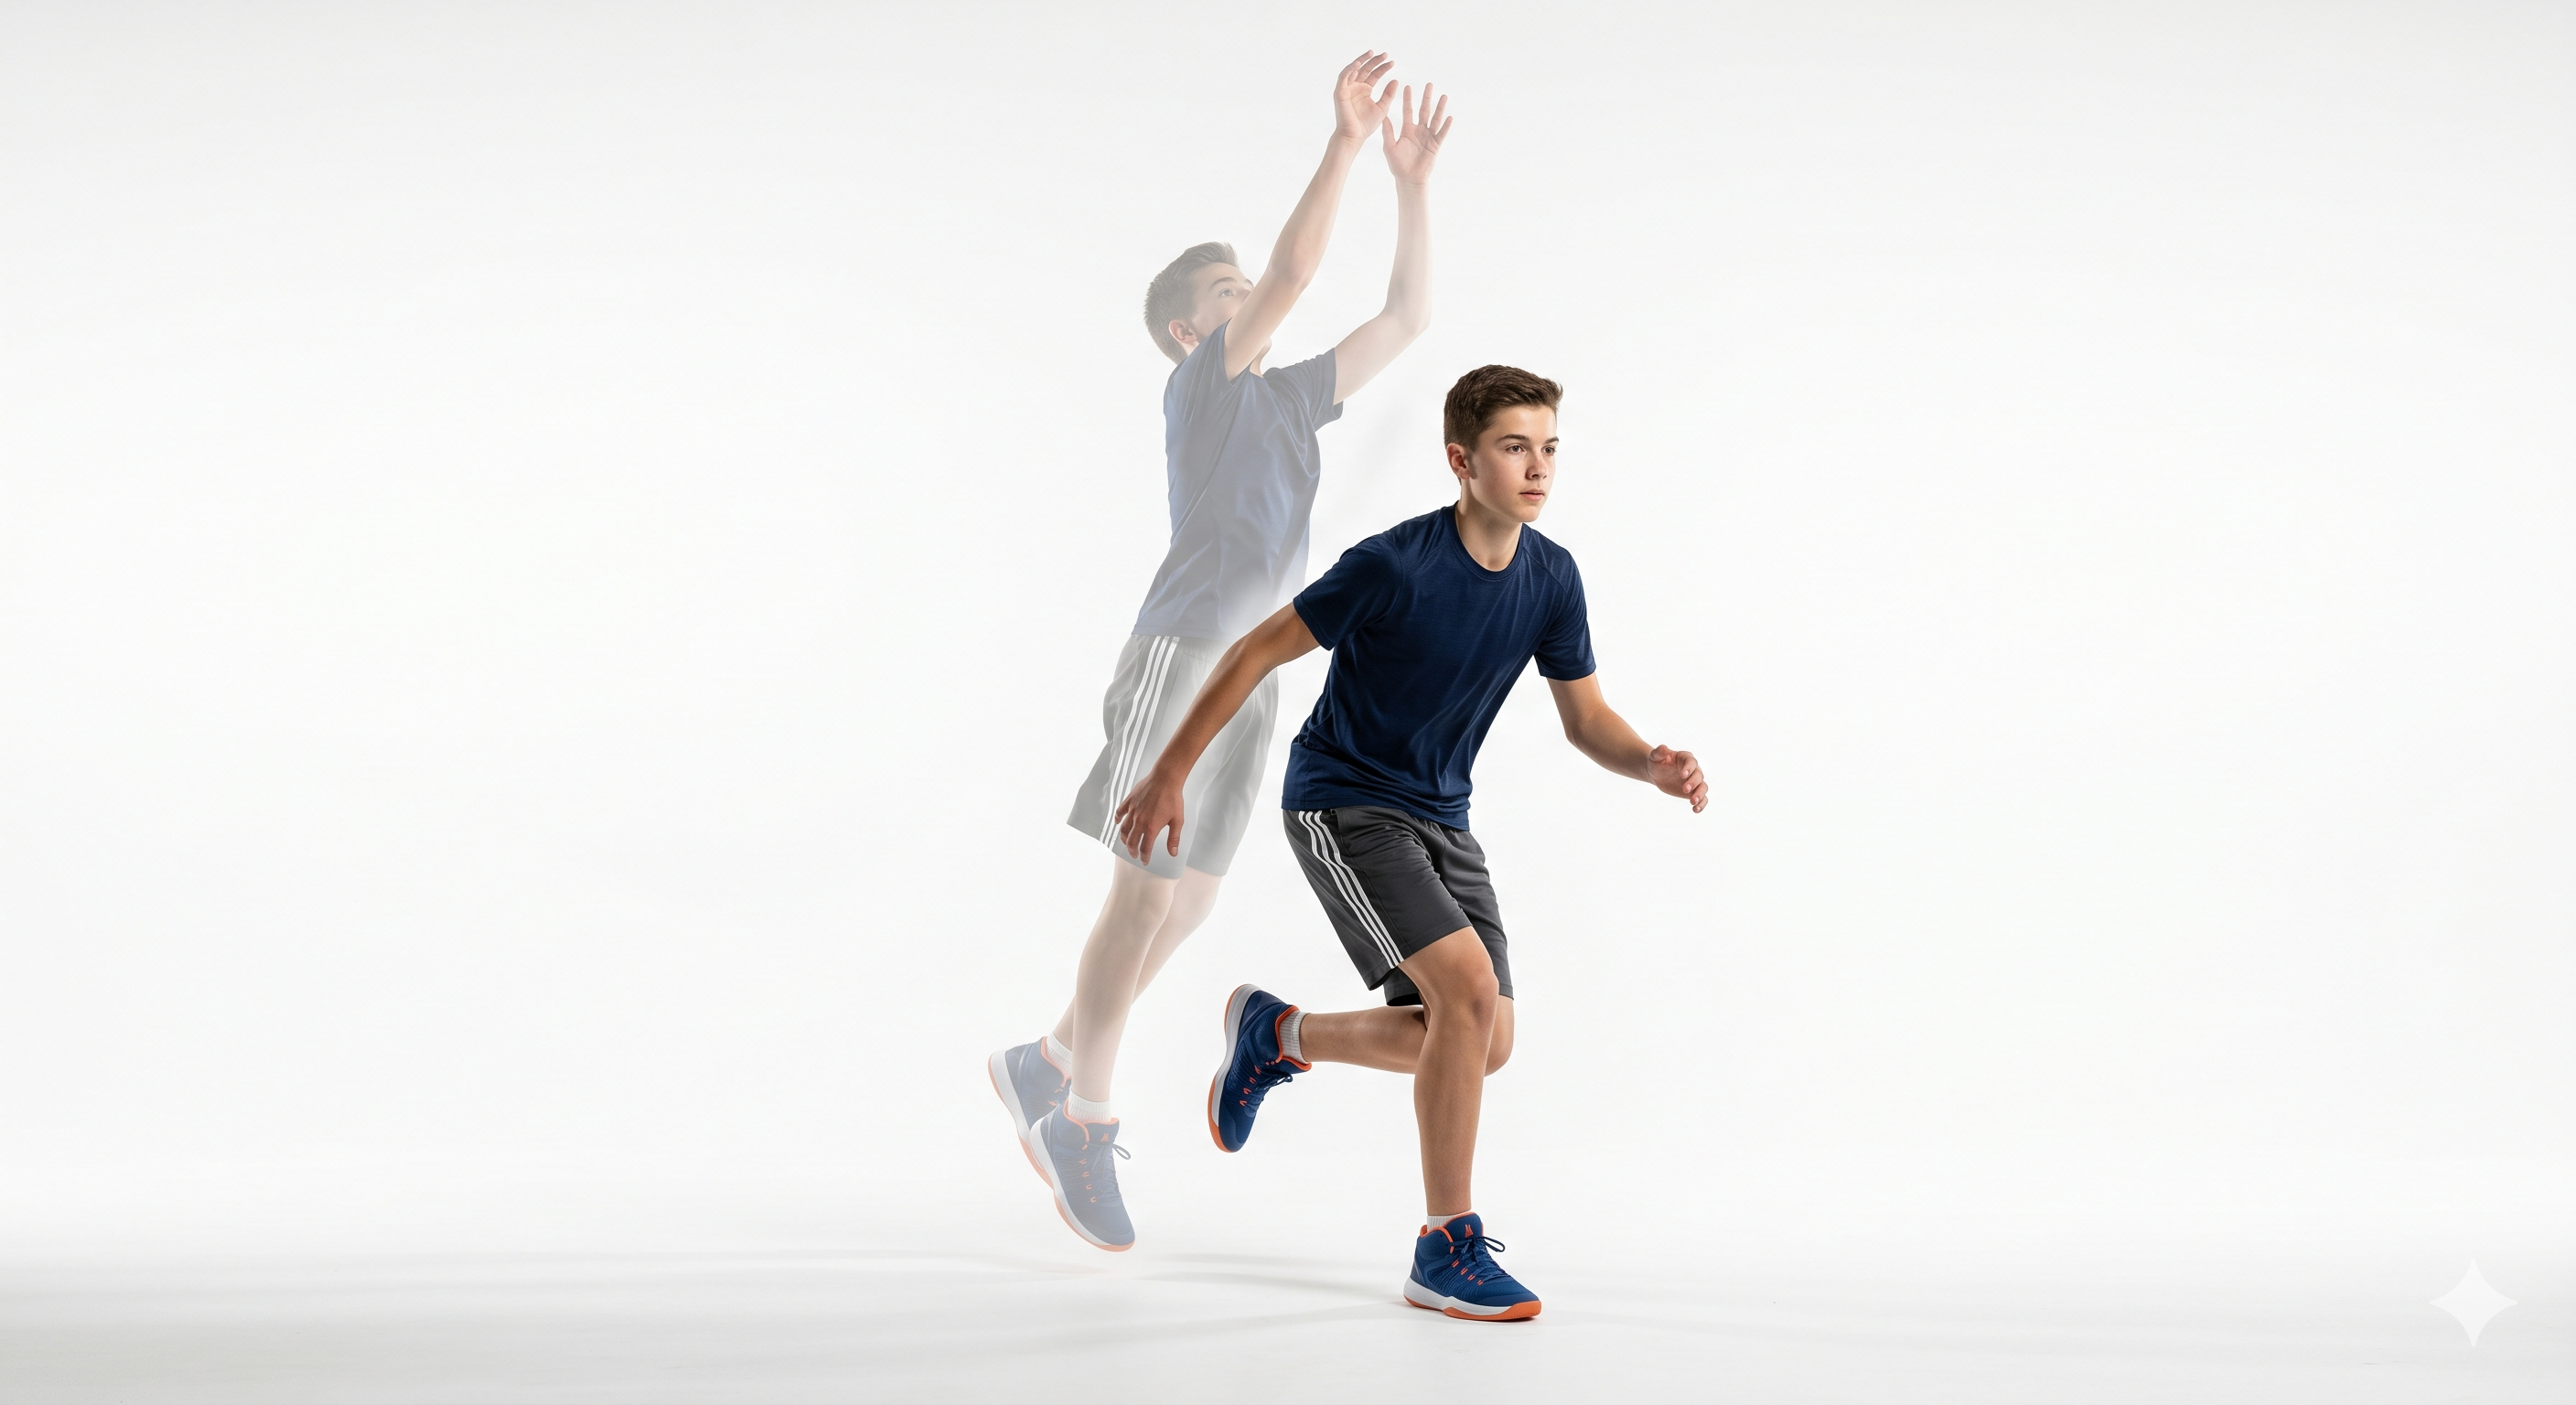
Jump Off Two, Land on One
A two-leg takeoff generates more force than a single-leg hop. Landing that force on one leg and holding the position is the closest approximation to what sport actually demands: the contested landing, the hard cut off the wrong foot, the split-second deceleration after a sprint. This movement also reveals psychological readiness. A subtle hesitation, a flinch, a rushed landing on the injured side tells you as much as the mechanics do. The body is still protecting rather than performing. That’s the ghost. Right there.
Two-leg takeoff, single-leg landing. Absorb with a bent knee and hip. Hold the landing position for three full seconds. Both sides, consecutive reps.
Readiness Standard 5 consecutive clean landings each leg. Strong, controlled, no drift. Both sides equal.
If it hurts: Return to Step 4 and build more hop volume. The reactive capacity isn’t ready yet.

What asymmetry is telling you

Work through these with your kid and watch for asymmetry. One side shakier, weaker, slower to stabilise. That’s the ghost. That’s the compensation pattern. That’s the load being transferred to the side that was never injured but carries the same underlying mechanics that got the other leg hurt.

When the injured side can’t match the uninjured side, don’t push to the next step. Stay there. Practice it. The work of closing that gap is the rebuilding, to a standard of readiness that ensures they can practice and perform as expected. Every rep is restoring the neuromuscular connection the injury disrupted.

In elite environments we have the luxury of baseline data. We know exactly what the athlete was capable of before the injury and we can measure how far they’ve come back. Most youth athletes don’t have that. What they have is this progression. If they can’t pass it, they’re not ready, regardless of what the clearance letter says.

The goal isn’t just to get back to where they were. It’s to come back with a system that functions better than it did before the injury happened. To get rid of the ghost that has them second-guessing every cut and every landing while nodding along when the adults around them say they should be good to go.

Building this into your routine before an injury happens

If your child hasn’t been injured and you’re reading this, run them through the progression anyway. See how they go. If they find it challenging on one side, that’s the information. Build the movements into a weekly routine as a warm-up before practice. Ten minutes at home before you get in the car is enough. If the drive is longer than 20 minutes, do it at the venue.

You can also do them after practice to build capacity under fatigue, which is closer to the conditions sport actually creates. If your child takes a knock at training and you want to check how the limb is responding the next morning, this is the sequence to run through. Stiff and sore is fine. Can’t hold a single-leg stance without significant pain or compensation is information that changes the plan for the day.

You don’t need to formalise this. You don’t need equipment beyond a box or a chair for the sit to stand. The benefit of strength coaches and movement specialists is real, but not every family has access to that. This is the version that works at home, in the backyard, or in a car park before training.


References

Huang, Y. et al. (2025). Investigating the effects of previous injury on subsequent training loads, physical fitness, and injuries in youth female basketball players. Frontiers in Physiology, 16, 1506611. doi.org/10.3389/fphys.2025.1506611

National SAFE KIDS Campaign and American Academy of Pediatrics. Youth sport injury statistics. Cited in Johns Hopkins Medicine and Stanford Children’s Health.

Rossato, C.J.L. et al. (2021). Epidemiology of sports-related injuries and associated risk factors in adolescent athletes: An injury surveillance study. International Journal of Environmental Research and Public Health, 18(9), 4857.

R1 Ready First tracks this every day.

R1 monitors Mind, Body, and Energy readiness daily so parents, athletes, and coaches know where an athlete actually stands, not just where they’ve been cleared to be.

How R1 works Learn about the study
← Previous Meeting Girls Where They Are

R1 is live.

The readiness system behind these articles: Mind, Body, and Energy, every day. Now on the App Store and Google Play.

Get the app